As you may know, I am venturing into the world of off shore jet ski fishing. As I learned today on my first trip out, a jet ski is a very versatile and fun fishing machine. But, like any fishing platform, it has to be set up first. One of the biggest challenges of a jet ski is how to carry your rods with you. A secondary challenge is storage. Since my fiance won't let me permanently modify my jet ski, and due to budget restraints, I decided to make a removable cooler rack/rod holder rack. I built this using an example off the Jet Ski Sportfishing website. Below you will find my measurements and materials list so that you can follow this example and build the exact same model. These are step by step instructions and plans and I hope you find them helpful. This would have saved me a ton of time from measuring twice and then cutting.
 |
| These instructions will help you build this rack! It can hold up to 6 rods/accessories and also has two trolling positions - perfect for my SeaDoo which goes 2-3 mph in forward gear. |
Step 1: Gather Materials
 |
| Also need safety glasses, a marker and a measuring tape. |
| Parts List |
| All PVC is 1.5" diameter - fits an Igoo 54 qt marine
cooler |
| |
|
|
|
|
|
| Fittings: |
|
|
PVC Pipe Sections |
|
|
| Elbows - |
10 |
|
#1 - |
3 x 9 in |
|
| Crosses - |
8 |
|
#2 - |
8 x 6.5 in |
|
| Tees - |
4 |
|
#3 - |
12 x 7 in |
|
| |
|
|
#4 - |
6 x 2.5 in |
|
Step 2: Cut PVC Pipe Sections to Spec and Label with Numbers.
Using a measuring tape, measure the 1.5" PVC Pipe and mark where you are going to cut. I used a miter saw, which was very easy and I recommend it. Make sure to wear your safety glasses. After you've made your cuts, label each pipe with the appropriate number (1-4 based on the parts list).
Step 3: Become familiar with the layout
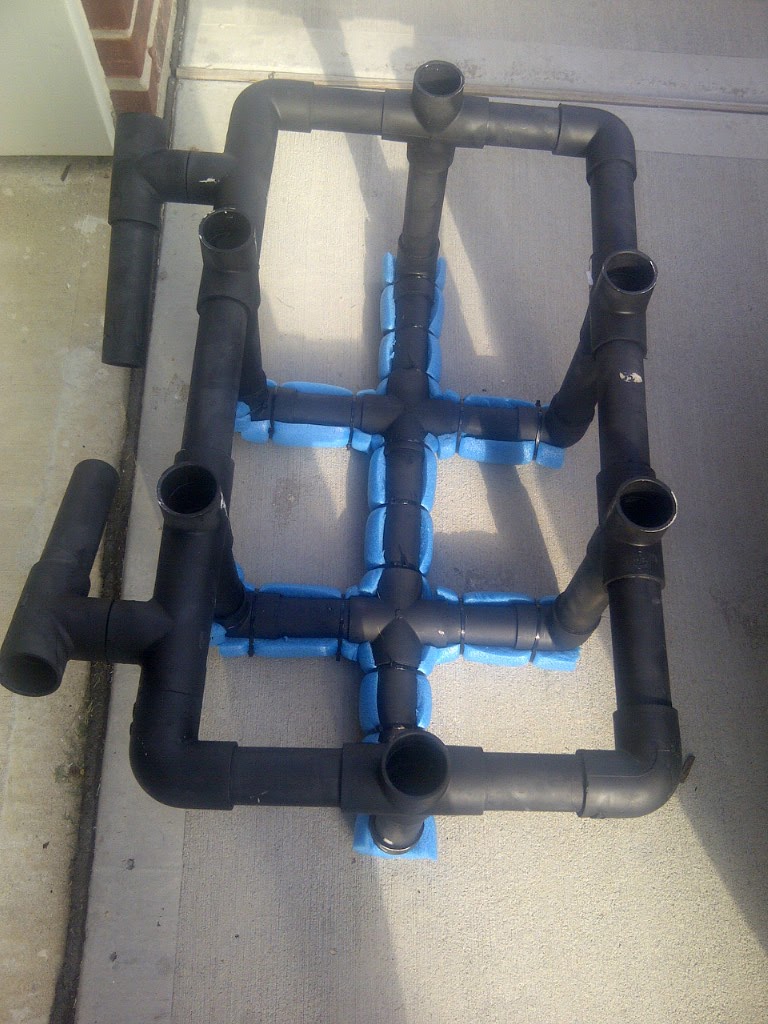
Take a look at the finished product pictures. You need to be comfortable using the diagrams below to see where each piece fits and how it fits together. I DO NOT recommend dry fitting, as I made this mistake and it can be very difficult to get the pieces apart. Just be comfortable with the way these go together and if you have any questions post a comment for me.
 |
| This is a picture of the basic layout. Note paint will chip off from time to time with use, its OK! |
Step 4: Begin Gluing
READ ALL THESE TIPS BEFORE PROCEEDING: When you feel comfortable with the assembly of the rack, start gluing. If you've never glued PVC before, you simply need to put the purple primer on the inside of the fitting up to where you can see the pipe would seat flush inside. Do the same on the pipe. I like to prime multiple parts at once. Once you've completed that, you can then use the PVC cement and spread it on the inside of the fitting first and then on the pipe. This makes it easier so you're not trying to hold onto a pipe wet with cement as you can usually put the fitting so the cement won't run out. Push the two pieces together, and if necessary hammer in with a rubber mallet until the pipe is flush with the fitting.
PAY ATTENTION TO THE ANGLE OF THE FITTINGS WHEN YOU ATTACH THE PIPE! They must be at the correct angle in order for everything to fit correctly. Read the captions on the pictures, as I tried to explain to the best of my ability. Double check the finished picture and be very comfortable with it.
I assembled THE BOTTOM PIECE FIRST and then assembled the top right and left halves of the rack separately. When it came down to it, PVC Pipes #1 were the last pipes that I had to install. In my rack, I actually had to cut them a bit shorter because it is a tight fit. The result is they are not flush in the crosses. You may know a better way, and if you do please share it in the comments. Another way may be to assemble front and back of the top half and then put the cross with PVC Pipes #2 in last. If you try this let me know - I don't need two racks so I'm not going to test it out.
OK, glue away.
 |
| This is the top section of the cooler rack showing how the numbered pipes and fittings fit together. Use the finished pictures if you need more detail. The Crosses all point vertical and the Tees that come off the front for trolling should be angled to your preference. |
 |
| This is the bottom portion of the rack. The Elbows should be facing vertical with Pipe #3 facing vertical as well. These will match up to the Crosses on the top section of the rack. |
Step 5: Drill Drain Holes
After you've allowed the cement to set (doesn't take long, read the instructions and it will tell you how long), flip the rack over. Drill holes in the bottom of EACH of the elbows - I drilled two in each. One in the bottom and one a little higher. You want to allow water to escape if it goes down into the rod tubes. I drilled a 1/8 " pilot hole then came back with a 3/8" hole for quick draining.
Step 6: Spray Paint
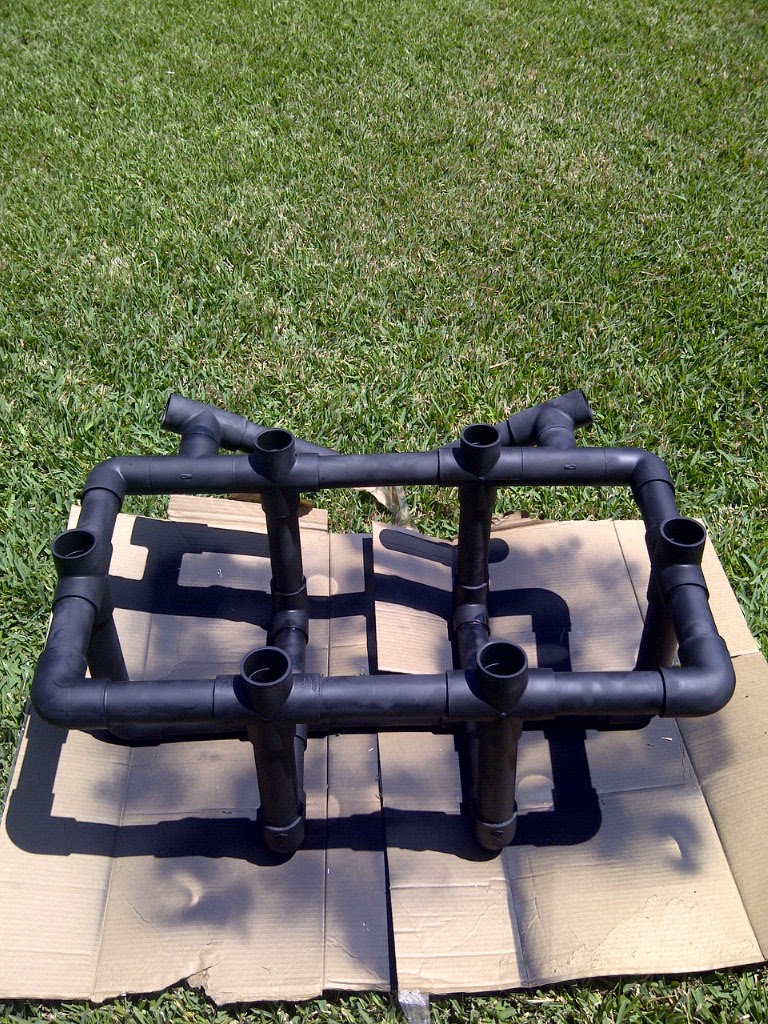
Take your rack to a place you don't mind getting spray paint on. For me, that was the grass in the back yard. Put it on the card board and spray paint your rack. Allow to dry to the touch (for me an hour) and then flip it over. Make sure to get full coverage. This is a cosmetic step but will make your rack look awesome. It will cover over any exposed cement, primer, and the numbers that you numbered your pipes. You did number your pipes, right?
 |
| The finished product on the card board spray paint. |
Step 7: Padding
After you've painted your rack, flip it over and measure each of the tubes on the bottom that the rack will sit on the back of your jet ski. I eyeballed this, and then cut pieces of noodle to the correct length. Cut it to match the length, then cut one side lengthwise to the middle of the noodle. This will allow you to fold the noodle around the PVC pipe. Secure using zip ties so that your rack is sitting all on noodles and no pipe will be touching/rubbing the padding on the back of your ski.
 |
| Add some kind of padding to the bottom of your rack to protect your ski. Notice the zip tie ends are inside the rack, not outside so as not to damage the foam on the back deck of the jet ski. |
Step 8: Test It Out
 |
| Side view of the rack on the jet ski |
 |
| Rear view of the rack on the jet ski |
Place it on the back deck of your jet ski so that the trolling holders are facing you. My ski, a 2007 Seadoo GTX has a ski hook. I bought two 24" rubber bungees with galvanized hooks on them to secure it to the ski. The first bungee is wrapped around PVC Pipe #1 twice (on the front) and then each hook goes to the ski hook. The second bungee wraps over the back side of the rack and attaches to my tie down hooks on the back of the ski. This setup is very sturdy. Place your cooler in, test out your rods/accessories, and modify as you see fit. If you have any cool modifications, be sure to submit them in the comments.
 |
| I secured the front part of the rack by wrapping a bungee around the tube and securing the hooks to the ski hook. |
I hope this helps you make your rack for your ski. It is a very affordable way. I took the ski out for the first time this weekend and held my rods and my buddy's rods, who didn't have a rack yet. He was very jealous!
 |
| Using rubber bungee and hooks to secure the back part of the rack |


Awesome work man. Looks great!
ReplyDeleteThis comment has been removed by the author.
ReplyDeleteThat is really cool. Thanks for taking the time to do a write up on it. I am picking up my used ski today, and building a rack this weekend. I believe yours will work perfect.
ReplyDeleteThanks
Richard P.
Thanks guys. Its been working great for me this year and I hope it works the same for you!
ReplyDeleteThis comment has been removed by the author.
ReplyDeleteI finished mine today. I had to deviate a bit from your plans because I could not get them to work exactly as you instructed, however you got me 99% the way there. Thanks!
ReplyDeleteHere is a pic of the finished product.
http://imgur.com/9WHlM2G
and this
ReplyDeletehttp://i.imgur.com/T9TGMn8.jpg
Looks like you got close to the design and I'm glad it worked out for you. The only change for mine is that the T's at the front go between the elbows and the crosses on the top rail, which frees up two additional "slots" to put gear down into by keeping the crosses open. Nevertheless, glad it worked out and hope you're on the big ones now!
DeleteAwesome post! Does the cooler get in the way of the pisser (water eject)?
ReplyDeleteYou can put a ball valve on the pisser to shut it off. Really easy to do.
DeleteAwesome! You can really do more using pipe racks. Nice Work Nick. Pipe Rack System
ReplyDeleteAm about to embark on making this up - my challenge is that on my 2006 Yam HO there is a fairley steep slope down on the rear platform that I need to accommodate for and end up with a mostly level box lid at the end - lots of inspiration from your design. So thanks for that.
ReplyDeleteWe are really grateful for your blog post. You will find a lot of approaches after visiting your post. I was exactly searching for. Thanks for such post and please keep it up. Great work. μηχανακια ψαρεματος
ReplyDeleteFantastic blog! Do you have any tips and hints for aspiring writers? I’m planning to start my own website soon but I’m a little lost on everything. Would you propose starting with a free platform like WordPress or go for a paid option? There are so many options out there that I’m completely overwhelmed .. Any suggestions? Many thanks! hydro jetting company riverside
ReplyDeleteThis comment has been removed by the author.
ReplyDelete