As you may know, I am venturing into the world of off shore jet ski fishing. As I learned today on my first trip out, a jet ski is a very versatile and fun fishing machine. But, like any fishing platform, it has to be set up first. One of the biggest challenges of a jet ski is how to carry your rods with you. A secondary challenge is storage. Since my fiance won't let me permanently modify my jet ski, and due to budget restraints, I decided to make a removable cooler rack/rod holder rack. I built this using an example off the Jet Ski Sportfishing website. Below you will find my measurements and materials list so that you can follow this example and build the exact same model. These are step by step instructions and plans and I hope you find them helpful. This would have saved me a ton of time from measuring twice and then cutting.
 |
| These instructions will help you build this rack! It can hold up to 6 rods/accessories and also has two trolling positions - perfect for my SeaDoo which goes 2-3 mph in forward gear. |
Step 1: Gather Materials
 |
| Also need safety glasses, a marker and a measuring tape. |
| Parts List |
| All PVC is 1.5" diameter - fits an Igoo 54 qt marine
cooler |
|
|
|
|
|
|
| Fittings: |
|
|
PVC Pipe Sections |
|
|
| Elbows - |
10 |
|
#1 - |
3 x 9 in |
|
| Crosses - |
8 |
|
#2 - |
8 x 6.5 in |
|
| Tees - |
4 |
|
#3 - |
12 x 7 in |
|
|
|
|
#4 - |
6 x 2.5 in |
|
Step 2: Cut PVC Pipe Sections to Spec and Label with Numbers.
Using a measuring tape, measure the 1.5" PVC Pipe and mark where you are going to cut. I used a miter saw, which was very easy and I recommend it. Make sure to wear your safety glasses. After you've made your cuts, label each pipe with the appropriate number (1-4 based on the parts list).
Step 3: Become familiar with the layout
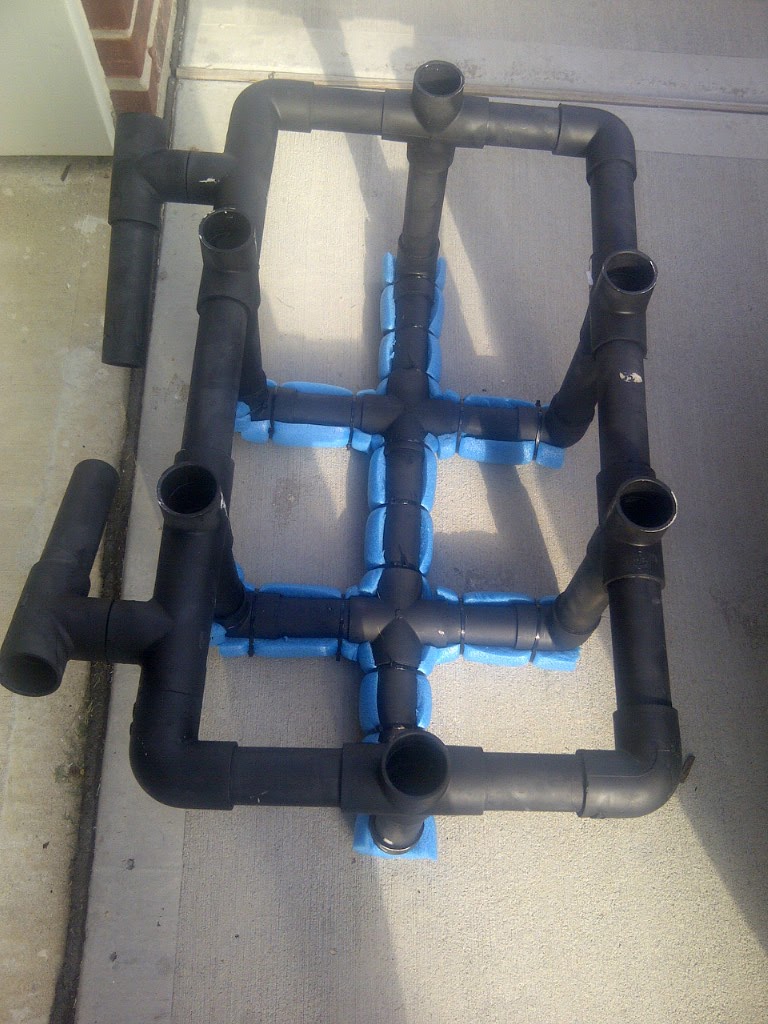
Take a look at the finished product pictures. You need to be comfortable using the diagrams below to see where each piece fits and how it fits together. I DO NOT recommend dry fitting, as I made this mistake and it can be very difficult to get the pieces apart. Just be comfortable with the way these go together and if you have any questions post a comment for me.
 |
| This is a picture of the basic layout. Note paint will chip off from time to time with use, its OK! |
Step 4: Begin Gluing
READ ALL THESE TIPS BEFORE PROCEEDING: When you feel comfortable with the assembly of the rack, start gluing. If you've never glued PVC before, you simply need to put the purple primer on the inside of the fitting up to where you can see the pipe would seat flush inside. Do the same on the pipe. I like to prime multiple parts at once. Once you've completed that, you can then use the PVC cement and spread it on the inside of the fitting first and then on the pipe. This makes it easier so you're not trying to hold onto a pipe wet with cement as you can usually put the fitting so the cement won't run out. Push the two pieces together, and if necessary hammer in with a rubber mallet until the pipe is flush with the fitting.
PAY ATTENTION TO THE ANGLE OF THE FITTINGS WHEN YOU ATTACH THE PIPE! They must be at the correct angle in order for everything to fit correctly. Read the captions on the pictures, as I tried to explain to the best of my ability. Double check the finished picture and be very comfortable with it.
I assembled THE BOTTOM PIECE FIRST and then assembled the top right and left halves of the rack separately. When it came down to it, PVC Pipes #1 were the last pipes that I had to install. In my rack, I actually had to cut them a bit shorter because it is a tight fit. The result is they are not flush in the crosses. You may know a better way, and if you do please share it in the comments. Another way may be to assemble front and back of the top half and then put the cross with PVC Pipes #2 in last. If you try this let me know - I don't need two racks so I'm not going to test it out.
OK, glue away.
 |
| This is the top section of the cooler rack showing how the numbered pipes and fittings fit together. Use the finished pictures if you need more detail. The Crosses all point vertical and the Tees that come off the front for trolling should be angled to your preference. |
 |
| This is the bottom portion of the rack. The Elbows should be facing vertical with Pipe #3 facing vertical as well. These will match up to the Crosses on the top section of the rack. |
Step 5: Drill Drain Holes
After you've allowed the cement to set (doesn't take long, read the instructions and it will tell you how long), flip the rack over. Drill holes in the bottom of EACH of the elbows - I drilled two in each. One in the bottom and one a little higher. You want to allow water to escape if it goes down into the rod tubes. I drilled a 1/8 " pilot hole then came back with a 3/8" hole for quick draining.
Step 6: Spray Paint
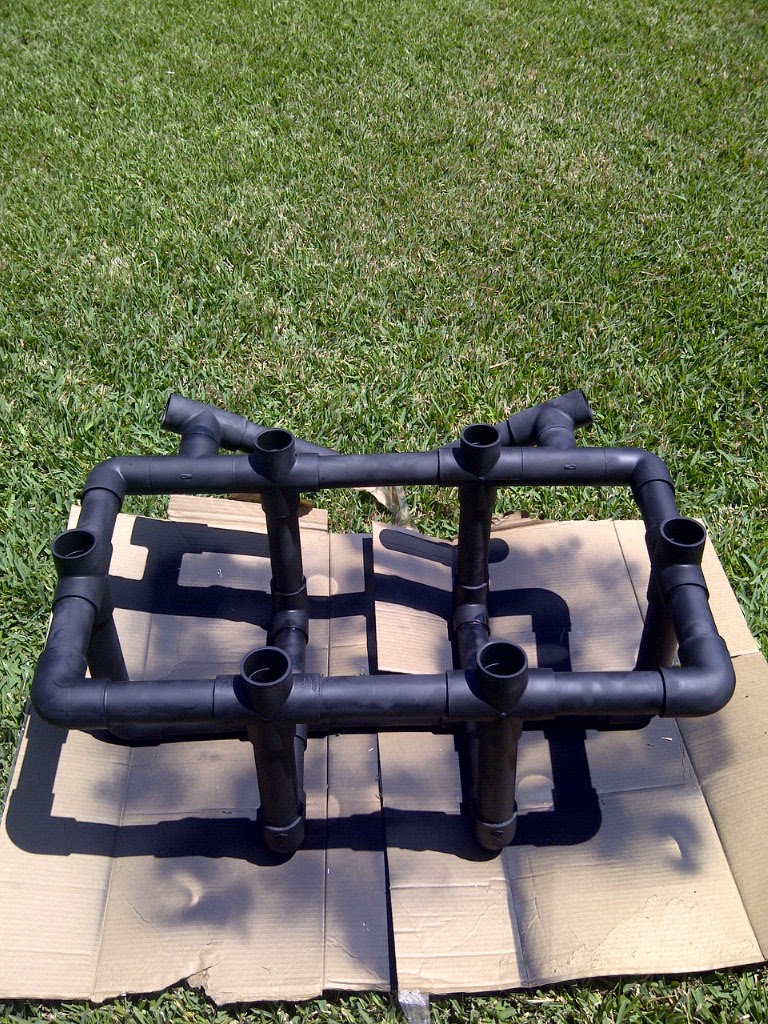
Take your rack to a place you don't mind getting spray paint on. For me, that was the grass in the back yard. Put it on the card board and spray paint your rack. Allow to dry to the touch (for me an hour) and then flip it over. Make sure to get full coverage. This is a cosmetic step but will make your rack look awesome. It will cover over any exposed cement, primer, and the numbers that you numbered your pipes. You did number your pipes, right?
 |
| The finished product on the card board spray paint. |
Step 7: Padding
After you've painted your rack, flip it over and measure each of the tubes on the bottom that the rack will sit on the back of your jet ski. I eyeballed this, and then cut pieces of noodle to the correct length. Cut it to match the length, then cut one side lengthwise to the middle of the noodle. This will allow you to fold the noodle around the PVC pipe. Secure using zip ties so that your rack is sitting all on noodles and no pipe will be touching/rubbing the padding on the back of your ski.
 |
| Add some kind of padding to the bottom of your rack to protect your ski. Notice the zip tie ends are inside the rack, not outside so as not to damage the foam on the back deck of the jet ski. |
Step 8: Test It Out
 |
| Side view of the rack on the jet ski |
 |
| Rear view of the rack on the jet ski |
Place it on the back deck of your jet ski so that the trolling holders are facing you. My ski, a 2007 Seadoo GTX has a ski hook. I bought two 24" rubber bungees with galvanized hooks on them to secure it to the ski. The first bungee is wrapped around PVC Pipe #1 twice (on the front) and then each hook goes to the ski hook. The second bungee wraps over the back side of the rack and attaches to my tie down hooks on the back of the ski. This setup is very sturdy. Place your cooler in, test out your rods/accessories, and modify as you see fit. If you have any cool modifications, be sure to submit them in the comments.
 |
| I secured the front part of the rack by wrapping a bungee around the tube and securing the hooks to the ski hook. |
I hope this helps you make your rack for your ski. It is a very affordable way. I took the ski out for the first time this weekend and held my rods and my buddy's rods, who didn't have a rack yet. He was very jealous!
 |
| Using rubber bungee and hooks to secure the back part of the rack |


What size cooler does it fit?
ReplyDeleteThe white igloo 54 qt marine cooler.
ReplyDeleteAwesome thanks made one going to test it in the ocean great idea
ReplyDeleteCool and awesome!
ReplyDeleterev6sports.com
Great work !!! Thanks for posting !!
ReplyDeleteHey bud great design. You need 8 #2's not 2 of them. I bought extra pvc So All I did was have to cut 6 more but it could been a big bummer.
ReplyDeleteThanks Blaine. Fixed it now for you!
DeleteThis is an awesome and simple rig! Gonna try one out here on GUAM!
ReplyDelete...Great Idea, I'm going to put this on m GTS.
ReplyDeleteGood Job! You have done brilliant job to build pvc cooler rack. Great idea!
ReplyDeletesnowboard and ski online
great idea about pvc pipes
ReplyDeleteFYI after building 2 of these I have found that if you go with a Coleman marine cooler instead of an Igloo it will hold a 70qt cooler perfectly.
ReplyDeleteI built one for a Yamaha fx. I lengthened the #1 sections by 3 inches and appropriately shortened the other sections. Now the rack fits better around the bulkhead of the seat and it doesn't overhang the ski.
ReplyDeletethanks ken cohen i'm getting ready to make one for my fx thanks jody
DeleteTo clarify I elimitated the tees that hold the tilted rod holders and replaced them with sections of pipe.
DeleteTo clarify I elimitated the tees that hold the tilted rod holders and replaced them with sections of pipe.
DeleteWill be be hard to get back on jet ski with this on the back?
ReplyDeleteWill be be hard to get back on jet ski with this on the back?
ReplyDeleteHow much did it all cost you??
ReplyDeleteWhick 70ct coleman cooler did you use. I bought one from walmart and it was to big. Can you send or post a link?
ReplyDeleteThis comment has been removed by the author.
ReplyDeleteI built one in about 4 hours.
Deletemay know, I am venturing into the world of off shore jet ski fishing. As I learned today on my first trip out, a jet ski is a very versatile and fun fishing ... jetskistand.blogspot.com
ReplyDeleteJust made this weekend. Was easy and quick with your directions. Many thanks! What did you use for a rod leash. Any recommendations on current fish finders best for PWC's?
ReplyDeleteValuable post, Thanks for sharing information with us.
ReplyDeletePlumbing Pipe
This comment has been removed by the author.
ReplyDeleteThis comment has been removed by the author.
ReplyDeleteI came to know about sea the city as they provide various types of tours and travel packages at a cheap price NYC Bachelor Party. They have their exotic group events like corporate outings, client entertainment, team building, bachelor parties, bachelorette parties and birthday Parties. They also provide jet ski experience and liberty landing marina which are unforgettable NYC Client Entertainment.
ReplyDeleteHow did it hold up?
ReplyDeleteNice and informative blog, This blogs offers so many informative things about Jet Ski.Thanks for sharing.
ReplyDeleteCustom Dirt Bike Graphics
Great idea executed by you Nick. i am going to follow your steps and instructions. I hope this helps me for my jet ski.
ReplyDeleteraptor atv
Most valuable and fantastic blog I really appreciate your work which you have done about the SeaDoo GTI SE JetSki,many thanks and keep it up.
ReplyDeleteSeaDoo GTI SE JetSki
Valuable information in your blog and I really appreciate your work and keep it up dude I really very informative blog about the boat detailing i appreciate it.
ReplyDeletemobile boat detailing
Your Post is very useful, I am truly happy to post my note on this blog. It helped me with ocean of awareness so I really consider you will do much better in the future.
ReplyDeleteMotocross Decals
Thanks for the information about the custom yacht signs and links you shared this is so should be a useful and quite informative!
ReplyDeletecustom yacht signs
day deo the nhan vien - PRICE WORKING WELDERS
ReplyDeleteYOYO TUTORIAL - TUTORIAL - TEAM - STUDENT - Bang ten nhan vien
We specialize in the manufacture of pvc la gi products for students in grades 1-2-3. With various designs depending on the design requirements of your company, school authorities, ... Especially the products are processed printing company logo, slogan print or brand image.
Contact: the nhan vien or print shop in day deo the
VERY COOL!
ReplyDeleteThanks for the info,was checking online for ideas and the prices for the pre manufactured ones are really so expensive my freind found your site and turned me on to it,I will be buildiing it this week and installing it and will post pictures after ,thanks for the info
ReplyDeleteThe case study you have posted here is definitely seem very important. So, thanks for posting...
ReplyDeletewright more blog and blog post like that for us. Thanks you once agian
ReplyDeleteTherefore busy in gambling sites will be quite crowded because Agen SBOBET it can create a large profit in it. Except this busyness will actually be able to bring you to create significant and drastic profits if you have great promise and motivation in carrying out transactions in it
Thanks for the information. It's very useful. If any one is looking for the best piano teacher in Singapore
슬롯사이트-크레이지슬롯
스포츠토토사이트
하이게이밍
해시게임
바카라사이트
https://ocn2001.com/
Thanks for sharing such kind of nice and wonderful collection......Nice post keep it up and keep sharing. Do you want boat accessories? Visit here Fishing pole holders
ReplyDeleteGood read for me and i learn so much. go on a boat
ReplyDeleteTravelling place is good for entertainment.
ReplyDeleteIt is a good article post. thanks for sharing.
many people enjoy travelling space. its very enjoyful.
Deep sea fishing dubai
Water adventure dubai
Dubai water adventure
Dubai deep sea fishing trip
Water activities in dubai
Dubai yacht rental prices
Yacht rental dubai marina
Luxury yacht rental dubai marina
Dubai marina yacht rent
Water sports dubai